Fetch a loyalty ledger in Bloomreach Engagement
In this tutorial, let's set up Bloomreach Engagement to retrieve the loyalty ledger information of a customer from Talon.One.
Talon.One requirements
- You are an admin user.
- You have set up an Application that contains customer profiles.
- You have set up a profile-based loyalty program.
Bloomreach requirements
- You have set up an email provider.
- You have set up a consent category.
- You have a way to identify a given customer across Talon.One and Bloomreach. For example, the customer's email address in Bloomreach matches the integration ID in Talon.One.
A good understanding of email marketing can help you tailor your scenarios effectively. We highly recommend you read the Bloomreach documentation first.
Set up the integration
Create an Integration API key
An Integration API key allows authentication for incoming webhook requests in Talon.One.
To create an API key:
In your Application, click Settings > Integration API Keys.
Click Create API Key.
In the Create API Key drawer, if you are asked for a key type, select Production.
In Key name, type a name to identify the key.
In Key expiration date, select a date.
tipAvoid choosing expiration dates that fall at the end of the year or during other high-traffic periods.In Third-party integration, select Yes.
From Platform, select Customer Engagement Platform.
Click Create API Key.
Click to copy the key for use.
You cannot view or copy the API key after closing the drawer.
Configure webhook authentication
In Bloomreach Engagement, let's configure the webhook authentication for Talon.One so that data can be passed securely in the webhook request. We will use this webhook authentication while creating a scenario in a later step.
To configure the webhook authentication:
-
In Bloomreach Engagement, open Data & Assets > Integrations.
-
Click Add new integration
-
Click HTTP Authentication Schemas.
-
In Endpoint, type the following endpoint URL:
See API DocsGET Get loyalty ledgerhttps://integration.talon.one/customer_engagement/loyalty -
Click Custom headers, and enter the following headers:
Key Value Type AuthorizationApiKey-v1 YOUR_API_KEY, whereYOUR_API_KEYis the API key you created.public destination-hostnameThe base URL of your Talon.One deployment, for example, mycompany.europe-west1.talon.one.public customer-engagement-platform-nameBloomreachEngagementpublic -
At the top-left of the page, click the name of the integration to rename it appropriately.
-
Click Save integration.
Create a scenario
In Bloomreach Engagement, let's create a scenario to fetch loyalty ledger information from Talon.One and use it in an email.
For this tutorial, we'll create a simple demo scenario that sends an email one minute after you start the scenario. To do so:
- In Bloomreach Engagement, open Campaigns > Scenarios > New Scenario.
- (Optional) At the top-left of the page, click the name of the scenario to rename it appropriately.
- Add a Now trigger and a Wait operator and connect them.
- Double-click the Wait operator and set Specific time period to
1minutes. - Add a Webhook action and connect it to the Wait operator.
- Double-click the Webhook action and configure the following parameters:
- In the Editor tab:
-
Click the POST dropdown and change it to GET.
-
Enter the following URL:
https:/customer_engagement/loyalty?loyaltyProgramId=YOUR_LOYALTY_PROGRAM_ID&profileIntegrationId=CUSTOMER_INTEGRATION_ID-
YOUR_LOYALTY_PROGRAM_IDis the ID of your loyalty program in Talon.One.tipTo see the loyalty program ID, open your Talon.One loyalty program and check the URL in your browser.
For example, if the URL ishttps://mycompany.europe-west1.talon.one/loyalty_programs/402/dashboard, the program ID is402. -
CUSTOMER_INTEGRATION_IDis a unique identifier of your customers.
Use Jinja expressions to reference customer attributes in Bloomreach. For example, to reference the customer's email address, use{{ customer.email }}.Loyalty ledger information will be fetched for the customer with this integration ID in Talon.One. A customer profile with this ID must already exist in Talon.One.
-
-
Click the Do not process response dropdown and change it to Process response as JSON.
-
- In the Settings tab:
- Enable Authentication and select the webhook authentication you created.
- In Other, select the required consent category for your customers.
- Click Done.
- In the Editor tab:
- Add an Email action and connect it to the Webhook action.
- Double-click the Email action, click HTML builder, and configure the following parameters:
-
In the Editor tab:
-
In Subject line, enter the title of the email.
-
Add the following HTML code:
<html>
<head><meta charset="utf-8" /></head>
<body>
  <p>In the loyalty program "{{ webhook.title }}", you have acquired {{ webhook.ledger.currentBalance }} points.</p>
  <p>Congratulations!</p>
</body>
</html>
-
-
In the Settings tab:
- In Recipients, choose Customers matching campaign if you already set up a campaign, or Set recipient manually to test the scenario with a single recipient.
- In Consent category, select the required consent category for your customers.
-
Click Done.
-
- Click Save.
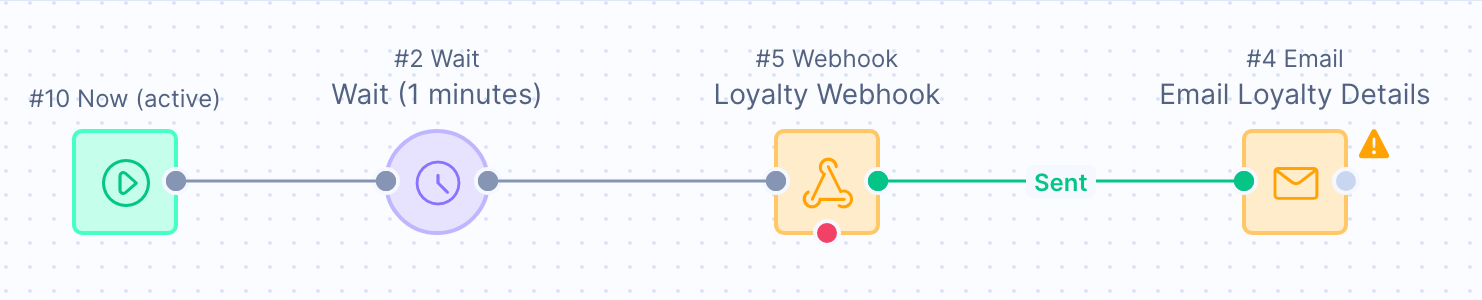
The scenario should now look like this:
You can also create a webhook preset, which is a reusable webhook template that you can use in your Bloomreach Engagement scenarios.
Run the scenario
Before you run the scenario you created, you can test and preview the complete workflow in the Test tab.
To run the scenario, click Start. You will see a confirmation window indicating how many customers will be affected by the scenario run.
After one minute, an email will be sent to the configured recipients, containing the text In your loyalty program ...,
followed by the loyalty information fetched from Talon.One.