Webhooks
A webhook allows a Talon.One Application to send information in real-time to third-party software.
You can configure a webhook to be triggered by a specific event and send an HTTP request containing a payload that you define to a URL of your choice. A webhook is always triggered as an effect inside a rule.
This page provides generic information about webhooks. For an example, see the webhook tutorial.
Custom effects and webhooks allow you to send data from Talon.One to the platform of your choice.
Before choosing one over the other, consider the following:
- If you prefer receiving the data in your integration layer and parsing it like any other effect, use a custom effect.
- If you want the data to be sent to a specific URI, consider using a webhook instead.
- To create and manage webhooks, ensure you are the admin or Application admin for every Application the webhook is connected to.
- Your contract can determine the maximum number of webhooks that you can create. You can find this information in the Campaign Manager, in Account > Usage & Limits.
Define the webhook payload
You can define the payload of a webhook when you create one. The payload can contain the following references:
- Parameters: A value that you define in a rule and is inserted in the webhook payload when the rule is successfully evaluated.
- Attributes: A value that is stored inside Talon.One, for example, the customer's location or the session's value. It can come from the integration layer via the Update customer profile or Update customer session endpoints. See the Attributes page.
Use parameters in the webhook payload
Use parameters to define a value in the webhook payload when you call the webhook in the effect.
For example, imagine you want to send an email via a webhook. You can define the body text of the email in an effect while calling the webhook:
-
In the webhook you create, add a parameter named
bodyText: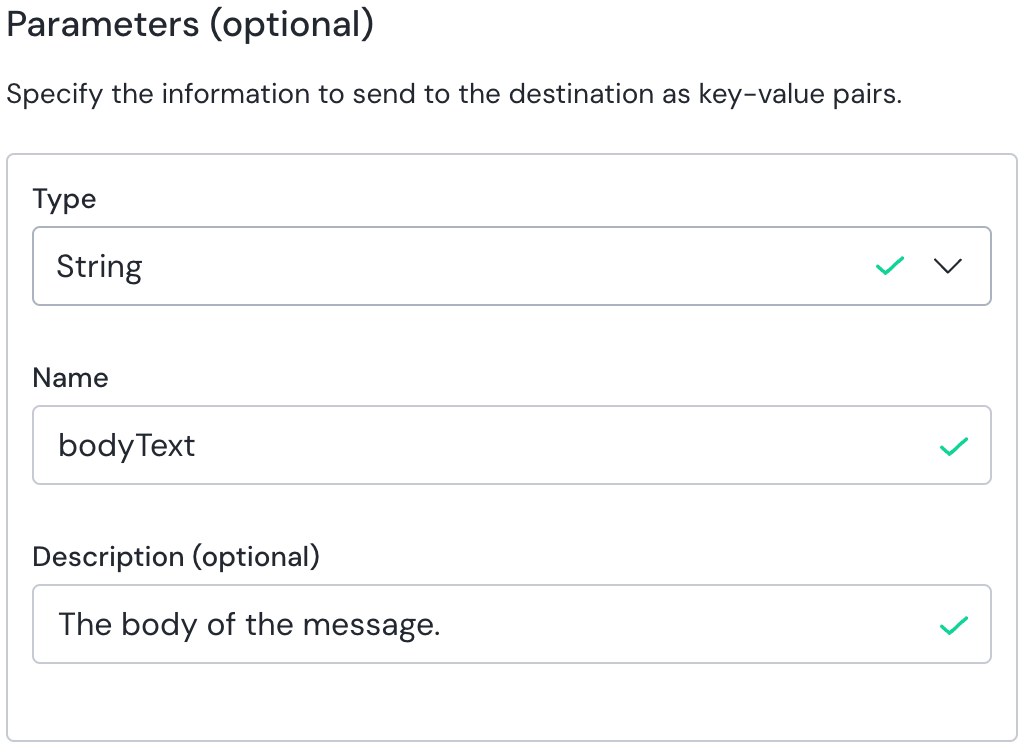
-
In the Payload section, paste the following payload to store the
bodyTextparameter value in a property namedbodyin the request:{
"body": "${$bodyText}"
}importantThe parameter value (
bodyText, in this case) must match the name you gave it in step 1. -
Create a rule that uses this webhook as an effect and define the
bodyTextvalue to use:
Alternatively, you can share data from Talon.One without relying on a value defined in the webhook effect by using attributes.
Use attributes in the webhook payload
Use attributes to apply their value in the webhook payload when a request is sent.
- To reference a Built-in attribute,
use the
<entity>.<attributeName>pattern in the webhook payload.- For example, reference Integration ID (Customer Profile)
as
"my_prop": "${$Profile.IntegrationId}".
- For example, reference Integration ID (Customer Profile)
as
- To reference a Custom attribute,
use the
<entity>.Attributes.<attributeName>pattern in the webhook payload.- For example, reference myAttribute (Coupon)
as
"my_prop": "${$Coupon.Attributes.myAttribute}".
- For example, reference myAttribute (Coupon)
as
-
To view the available attributes, see Manage attributes.
-
If you are referencing attributes from the Attributes page, rename the following entities in the webhook payload:
- Rename
CustomerProfileasProfile.- For example,
CustomerProfile.namebecomes"my_prop": "${$Profile.name}".
- For example,
- Rename
CustomerSessionasSession.- For example,
CustomerSession.CurrentLocationbecomes"my_prop": "${$Session.CurrentLocation}".
- For example,
- Rename
Create a webhook
See Managing webhooks in the Product docs.
Webhook retry policy
Progressively delayed resend attempts are made up to 10 times
or until a 2xx response is received, whichever occurs first.
Resend attempts are made when a webhook request cannot be sent for the following reasons:
5xxresponse codes.429 Too Many Requestsresponse code.- There's no response at all.
Webhook requests have a response timeout of 10 seconds. Requests that time out are logged with no response code.